
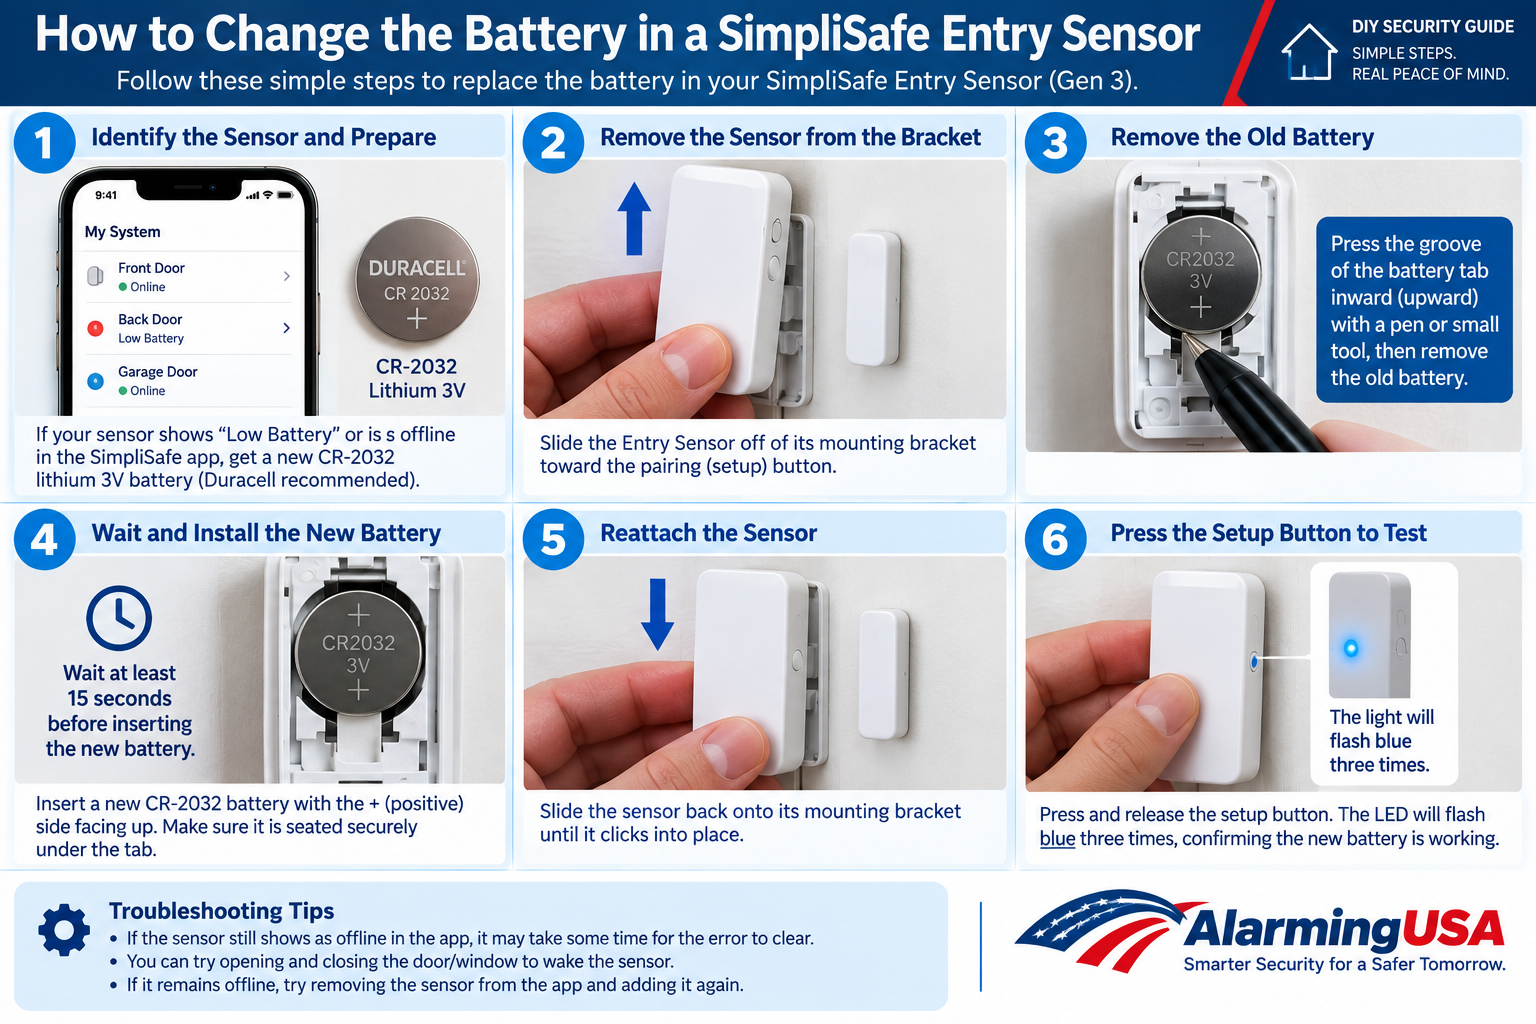
If your SimpliSafe Entry Sensor reports a low battery, goes offline, or stops responding, replacing the battery is a quick DIY maintenance job. This guide explains how to change the battery in a SimpliSafe Entry Sensor step by step, including which battery to use and what to do if the sensor stays offline afterward.
What Battery Does a SimpliSafe Entry Sensor Use?
For the current Gen 3 SimpliSafe Entry Sensor, SimpliSafe specifies one Duracell CR2032 lithium 3V battery. SimpliSafe says its expected battery life is up to five years depending on placement and usage.
Important: The Original SimpliSafe system uses different battery requirements. Confirm which SimpliSafe system you own before buying a replacement battery.
Step 1: Identify the Entry Sensor
Locate the Entry Sensor that is reporting a low-battery or offline condition. If necessary, use the SimpliSafe app or the sensor’s location name—such as Front Door or Back Door—to make sure you are servicing the correct device.
Step 2: Slide the Sensor Off Its Mounting Bracket
Apply even pressure and slide the Entry Sensor toward its pairing button to remove it from the mounting bracket. This exposes the battery compartment while allowing the mounting bracket to remain attached to the door or window.
Step 3: Remove the Old Battery
Remove the existing CR2032 battery. Depending on the Entry Sensor version, SimpliSafe says the battery may release by pressing the battery tab, or a small tool may be needed to press the retaining tab.
Step 4: Wait at Least 15 Seconds
Before installing the replacement battery, wait at least 15 seconds. This is also part of SimpliSafe’s recommended power-cycle procedure when troubleshooting an Entry Sensor that is not pairing or responding correctly.
Step 5: Install the New CR2032 Battery
Insert the new CR2032 lithium 3V battery in the correct orientation indicated by the sensor’s battery compartment. Make sure it is seated securely before putting the sensor back together.
Step 6: Slide the Entry Sensor Back Onto Its Bracket
Return the Entry Sensor to its mounting bracket and slide it securely back into position. Make sure you have not disturbed the alignment between the sensor and its magnet.
Step 7: Test the Entry Sensor
Press the pairing/setup button on the top of the Entry Sensor and confirm that its LED responds. SimpliSafe’s troubleshooting instructions say the LED should blink after the button is pressed. You can also open and close the protected door or window to verify that the system recognizes the sensor.
What If the Low-Battery Warning Does Not Disappear?
Do not immediately replace the new battery again. SimpliSafe says a low-battery or offline message can take up to 24 hours to clear because the Base Station needs to check back in with the sensor.
What If the Entry Sensor Is Still Offline?
If the Entry Sensor remains offline after the battery replacement, SimpliSafe recommends removing the sensor from the mobile app and adding it back to the system. In the app, go to My System > Device Settings, select the affected Entry Sensor, and choose Remove Device. You can then add the Entry Sensor again using the normal installation process.
Could the Base Station Location Be the Problem?
Yes. If the problem continues after replacing the battery, the Entry Sensor may have difficulty communicating with the Base Station. SimpliSafe recommends keeping the Base Station in a central, open location and away from devices that can contribute to wireless interference.
How Long Does a SimpliSafe Entry Sensor Battery Last?
SimpliSafe states that the current Entry Sensor battery can last up to five years, although actual battery life depends on placement and usage. A low-battery warning or a previously working sensor suddenly going offline can indicate that replacement is due.
Quick Battery Replacement Checklist
- Confirm you have a Gen 3 SimpliSafe Entry Sensor.
- Use one Duracell CR2032 lithium 3V battery.
- Slide the sensor toward the pairing button and off its bracket.
- Remove the old battery.
- Wait at least 15 seconds.
- Install the new battery in the correct orientation.
- Slide the sensor back onto its bracket.
- Press the setup/pairing button and test the sensor.
- Allow time for an old low-battery or offline warning to clear.
Need Help Installing an Entry Sensor?
If you are adding another sensor rather than replacing a battery, see our step-by-step guide to installing a SimpliSafe Entry Sensor.
Final Thoughts
Knowing how to change the battery in a SimpliSafe Entry Sensor makes routine system maintenance easy. For a Gen 3 Entry Sensor, use the specified CR2032 lithium 3V battery, wait at least 15 seconds during replacement, reinstall the sensor, and test it before considering the job complete.
If the sensor remains offline afterward, give the system time to update and then use SimpliSafe’s remove-and-reinstall procedure if necessary.
Looking for more information about the complete system? Read our SimpliSafe Review 2026 for details on equipment, DIY installation, monitoring options, app features, and more.

Need Help Installing an Entry Sensor?
If you are installing a new sensor, see our step-by-step guide to installing a SimpliSafe Entry Sensor .
Need a replacement battery? You can find the Duracell CR2032 3V Lithium Battery on Amazon.
As an Amazon Associate, Alarming USA may earn from qualifying purchases.