
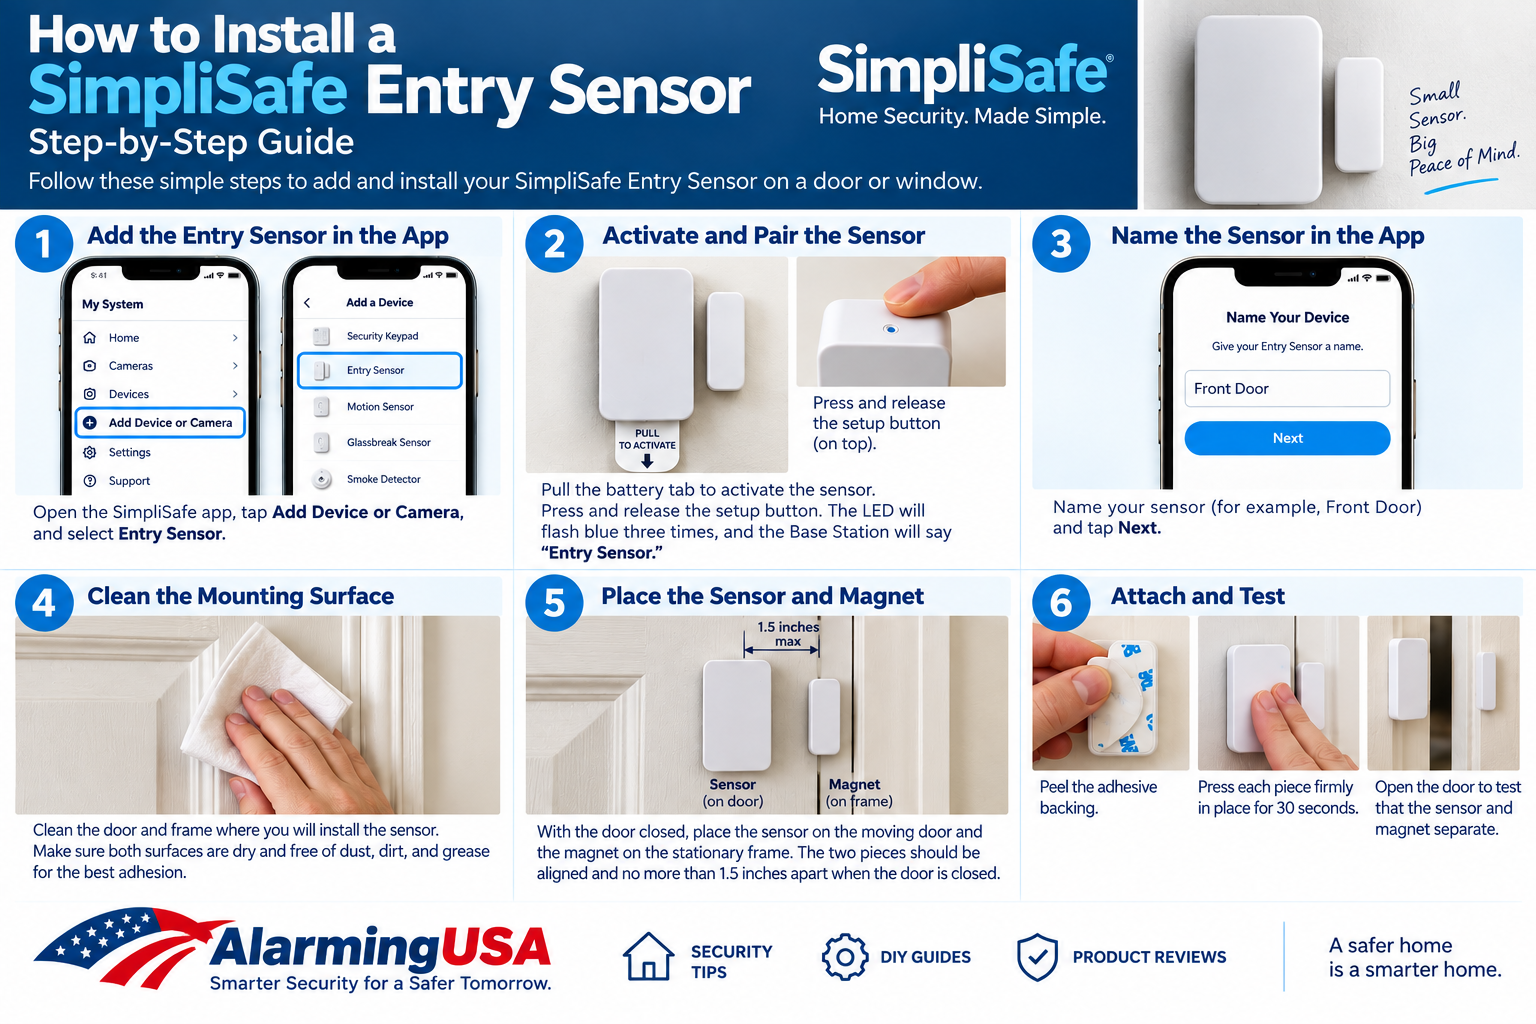
Installing a SimpliSafe Entry Sensor is a straightforward DIY project for monitoring a door or window. The sensor uses two pieces—a sensor and a magnet—to detect when the protected opening is opened or closed. This step-by-step guide walks through adding the sensor to your system, choosing a location, mounting it, and testing it.
How to Install a SimpliSafe Entry Sensor
Before mounting anything permanently, have your SimpliSafe system and app ready and decide which door or window you want to protect. Follow the setup prompts for your system and Entry Sensor generation, since screens and button locations can vary.
Step 1: Add the Entry Sensor to SimpliSafe
Open the SimpliSafe app and use the device setup controls to add an Entry Sensor to your system. Follow the on-screen instructions to begin pairing the sensor with your Base Station.
Step 2: Activate and Pair the Sensor
Remove the battery activation tab if your new sensor has one, then follow the app’s pairing instructions. Depending on the sensor generation, you may be asked to press its setup or test button so the system can identify it.
Step 3: Give the Sensor a Useful Name
Choose a descriptive name such as Front Door, Back Door, or Kitchen Window. Clear names make alerts easier to understand later, especially as you add more sensors.
Step 4: Clean and Dry the Mounting Surface
Before using the adhesive strips, clean the areas where the sensor and magnet will be mounted and allow the surfaces to dry completely. Dust, dirt, grease, or moisture can reduce adhesion.
Step 5: Position the Sensor and Magnet
With the door or window closed, position the sensor and magnet next to each other. SimpliSafe’s installation guidance says the two pieces should be no more than 1.5 inches apart when the opening is closed. Make sure their placement allows the pieces to separate when the door or window opens.
Step 6: Attach the Entry Sensor
Remove the adhesive backing and press each piece firmly onto its mounting surface. SimpliSafe recommends holding the pieces firmly in place for about 30 seconds to help the adhesive bond. Follow the instructions included with your sensor if you prefer a supported screw-mounting option.
Step 7: Test the SimpliSafe Entry Sensor
After installation, open and close the protected door or window and confirm that SimpliSafe correctly recognizes the change. Testing immediately lets you correct alignment or spacing before relying on the sensor.
Where Should You Mount a SimpliSafe Entry Sensor?
Entry Sensors are commonly used on exterior doors and accessible windows. Choose a location where the sensor and magnet can remain close together when the opening is closed and separate reliably when it opens. Avoid positions where normal movement, trim, or hardware can strike the sensor.
Can You Install a SimpliSafe Entry Sensor on a Window?
Yes. Entry Sensors can be used to monitor compatible windows as well as doors. The same basic principle applies: the two pieces stay close together when the window is closed and separate when it opens. Always test the finished installation.
What If the Entry Sensor Does Not Work After Installation?
First, check the alignment and distance between the sensor and magnet. Then confirm the sensor was successfully added to the system and that its battery is installed correctly. Re-test the opening after making adjustments. If the problem continues, use the troubleshooting instructions for your specific SimpliSafe sensor generation.
Quick Installation Checklist
- Add the Entry Sensor to your SimpliSafe system.
- Activate and pair the sensor by following the app prompts.
- Give it a clear location name.
- Clean and completely dry the mounting surfaces.
- Position the sensor and magnet within 1.5 inches when closed.
- Press adhesive-mounted pieces firmly for about 30 seconds.
- Open and close the door or window to test the finished installation.
Final Thoughts
Learning how to install a SimpliSafe Entry Sensor is a useful first DIY project when setting up a SimpliSafe system. The most important parts are pairing the sensor correctly, mounting the two pieces close enough together, and testing the door or window after installation.
Once this guide is in place, other useful SimpliSafe DIY projects include changing Entry Sensor batteries, fixing sensors that are not responding, installing motion sensors, and troubleshooting Base Station or Wi-Fi problems.
Considering a complete SimpliSafe system? Read our SimpliSafe Review 2026 for a closer look at installation, equipment, monitoring options, app features, and the pros and cons of the system.

Need to Change the Entry Sensor Battery?
If your sensor later reports a low battery or stops responding, see our step-by-step guide to changing a SimpliSafe Entry Sensor battery .